Tuesday, June 21, 2011

MPS June Design Team Post

Birthday Wishes


Gate Fold Card - Inside


Close-Up

 Supplies & Instructions
Gate fold card base - I wanted my finish card to measure 4"x 6" so it was 6"x 8" and scored at 2" & 6" on the long side. This is the first Gate Fold card I made and it was so super easy.
Pink Center Layer - It was originally cut about 2"x 6" then I used an EK Success Border punch on both sides of it. Then adhere it to the left side of the gate.

Straight From the Nest Cricut Cartridge
Butterfly - Button #5 - 2.75"
Oval Frame - Button #39 - 4.50"
Core'dination Paper
Glossy Accents
Brad

Visit the rest of the design team projects at www.mypinkstamper.com


Saturday, June 18, 2011

Graduation Card

The hardest cards for me to make are Graduation and Mono Chromatic, meaning a card primarily with one color. The reason Graduation cards are difficult for me is because I don't have very many Cricut Cuts or Stamps to choose from. The cap on this card was cut from Wild Card Cricut Cartridge. It is actually a card and there are no layers for it. So the way I cut it is on my Gyspy, and I move it to the edge so only the front of the cap is on the mat. Then I cut it out and trim off the extra paper. So finally I figured out how to make a Graduation Cap with the Cricut Cuts I have.


Inside

Supplies & Instructions
Wild Card Cricut Cartridge
Cap - Button #42 - 5.15" (only use 1 side of the cap card)
Scroll - Button #42 icon - 5.15"
Tassel - Button #42 liner - 5.15"
Plain Paper - Core'dination
Pattern Paper - DCWV The Grade School Stack
Color Scroll with Slate color Copic Marker
Brad

A bit about me....
I have been working on alot of projects. I sell my cards, notebooks, and paper crafts that I make. Tomorrow is our Church's Father's Day Fest. Its a hug outdoor event with a service, car show, monster trucks, cook-off, live bands, and I am running a craft fair at it. I am so excited to sell projects and cards I have made. What I sell will pay for my day at CHA Chicago in July. So I am praying for a profitable day. I am looking forward to tomorrow so much! Well enough about me, I need to go make some more stuff :)

Tuesday, June 14, 2011

Winner from My Pinkalicous Blog Hop

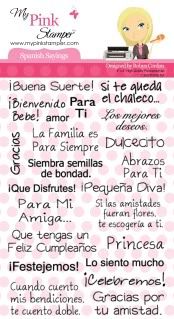
We have a Winner for the My Pink Stamper - Spanish Sayings Stamp Set from our Pinkalicous Blog Hop.
Congratulations to Carol from Carolee's Scrappin' Spot. Carol you have one week to email me to claim your prize.

If you need some Father's Day Project inspiration, check out some projects from Provo Craft HERE.

Monday, June 13, 2011

Great Father's Day Ideas from Provo Craft

Have you made that Father's Day Card or Special Gift yet? Do you need some inspiration or ideas? Well I have something special for you today. Provo Craft wanted to share how to make a Card, Box, and Cake that any Father would enjoy.

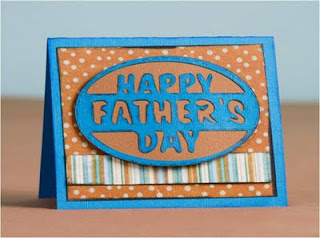
 Father's Day Card

 Father's Day Box

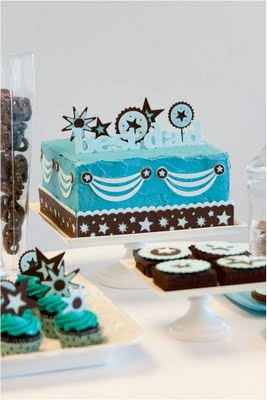
Father's Day Cake


Father's Day Card Instructions 
Materials:
Cricut® Expression Personal Electronic Cutter
Cricut® Father’s Day cartridge
Blue cardstock
Brown cardstock
Printed cardstock (2 different coordinating sheets)
Adhesive
Dimensional tape
Ink
Paper cutter
Instructions:
Using paper cutter, cut blue cardstock into a 6” x 10” rectangle then fold in half.
Using paper cutter, cut printed cardstock into a 5 ½” x 5 ½” square
Using paper cutter, coordinating printed cardstock into a 5 ½” x 1” rectangle
Using Cricut® and Cricut® Father’s Day cartridge and brown cardstock, cut 3 ½” Father’s Day
Using blue cardstock, cut 3 ½” Father’s Day layer
Ink all edges
Adhere layers of Happy Father’s Day
Using dimensional tape, adhere to card. 
Father's Day Box Instructions
Materials:
Cricut® Personal Electronic Cutter
Cricut® Father’s Day cartridge
Black cardstock
Blue cardstock
Printed cardstock
Adhesive
Dimensional tape
Paper cutter
Box 6” x 4”
Instructions:
Using printed cardstock and paper cutter, cut four squares 5 ½” x 3 ½” and one square 5 ½” x 5 ½”
Using coordinating printed cardstock and paper cutter, cut four squares 5” x 3” and one square 5” x 5"
Using Cricut®, Cricut® Father’s Day cartridge and black cardstock, cut 3” Poker, Can, Money and Pool Balls.  Cut 5” Background2.
Using printed cardstock, cut 3” PokerLyr, CanLyr, PoolballLyr, MoneyLyr.  Using printed cardstock, cut 5” #1Dad
Adhere mats to top and sides
Adhere layers of all cuts and attach to sides
Using dimensional tape, adhere #1 Dad cut to top of box
Father's Day Cake Instructions
Materials:
Cricut Cake® Personal Electronic Cutter
Cricut® Martha Stewart Crafts™ Seasonal Cake Art cartridge
10" x 5" Cake
Gum paste: brown, teal, aqua, light aqua
Buttercream frosting: turquoise
Food gel: brown
Toothpicks
Sugar glue
Cartridge Cuts:
Seasonal Cake Art cartridge
eight Fit to Length 5" star borders
eight Fit to Length 4.5" star banners
seventeen 1 ¾" circles with stars inside
two 1 ¾" best dad phrases
sixteen ½" stars
2 ½" starburst
2 ½" and 1 ¾" layered stars
1 ½" and 2" star wreaths
Designer Hints:

Cut all images from gum paste, using pictures for color references. Remove excess gum paste from cutting mats and images. Save brown stars from borders. Let gum paste dry so that the cuts can be removed from the mat without being distorted.

Layer borders, banners, and stars together as shown using sugar glue.

Layer borders and banners to cake as shown.

Layer best dad phrases together. Stand phrase on top of the cake as shown.

Paint toothpicks with food gel. Let dry. Attach toothpicks to backs of stars. Place on top of cake as shown.

To decorate cupcakes, brownies, or cookies, cut similar icons at desired sizes. Layer together and place on top of the goodies as shown.

Thank you Provo Craft for sharing these great projects with us.

Friday, June 10, 2011

Pinkalicious Blog Hop

Summer Happy Birthday Card


Welcome to the Pinkalicous blog hop. This is the last month of our design team's term. I have had so much fun getting to know so many of you crafters. This has truly been such a great experience and it was such an honor to be on My Pink Stamper's design team. Look for many more MPS projects this month.

If you are coming from Julie-readysetstamp, then you are right on track. If not, then you can begin the Blog Hop at www.mypinkstamper.com.

This Happy Birthday Stamp comes from My Pink Stamper's Sweetest Cupcakes Stamp Set. It is such a cute stamp set. To see all of Robyn's amazing stamp sets, click HERE.


This card had a lot of layers. I layed it out on my gypsy so I knew exactly how large each cut would be and so I could put the exact about of paper on the mat. It takes some practice but each square equals an inch on the mat, so the more you work with it, the easier it gets.


I actually cut a clear piece of packaging from something for a top layer on the cup. I adhered it with vellum adhesive.

Supplies & Instructions
Simply Charmed Cricut Cartridge button #21
Lemonade - 3.5"
Lemon - 2"
The Glitter Stack - DCWV - Pattern Paper
Core'dination Paper - Plain Paper
Brads

To celebrate all the fun we have had, I want to give away a My Pink Stamper Spanish Sayings Stamp Set. For a chance to win, leave only one comment and tell me what your favorite type of project is to make.


Join us for this challenge after the blog hop at www.mypinkstamper.com. Make any type of project with a Summer Theme.

From here hop to Kassidy at inkingitupcrazy for more Pinkalicous fun.

I am excited that CHA is coming up in July. I will be helping at My Pink Stamper & Tammy Skinner's booth on Saturday, July 23rd. I would love to meet you if you are there. So stop by and say Hi to us. CHA is my favorite crafting event of the year. To see so many people to enjoy crafting like I do and ALL the crafting supplies in one location, is amazing!

Angela's Simple Creations

The Lord is my light!


I've been working on lots of cards and projects for a Craft Fair that I will have a booth at next week. I wanted to share this card with you because it is unique in the mixed media and I love how it turned out. Sorry about the picture quality. I took it on my cell phone.

Supplies
Cuttlebug Embossing Folder
Copic Markers
Making Memories Brad
Core'dination Paper
Corner Rounder
Color Box Chalk Ink

Check back tonight for the MPS Pinkalicous Blog Hop at 8pm CST. It begins at www.mypinkstamper.com

Thursday, June 9, 2011

Tomorrow Pinkalicous Blog Hop

Tomorrow is our My Pink Stamper Pinkalicous Blog Hop. It begins at www.mypinkstamper.com at 8pm CST. Hop through all the amazing projects and then join us for the challenge when you are done. Oh, and by the way I will be giving something special away. So you won't want to miss it.