Showing posts with label Core'dinations. Show all posts

Friday, April 6, 2012

My Pink Stamper - Birthday Blog Hop


BIRTHDAY Wishes

Welcome to a night of fun! The My Pink Stamper Design Team & Guests would like to welcome you to a special Blog Hop, with all Birthday Projects. You can never have enough Birthday cards. You should be hopping here from Alex, if not go back to My Pink Stamper to start at the beginning of the blog hop to find a lot of great inspiration.

We have a Birthday Party this weekend for a 4 year old boy.
So I came up with this quick simple card.


I started this card as an A2 size card until I wanted to use this blue paper for the water but it wasn't wide enough. So I cut my card down to the with of my blue paper. I love the new size. Because I cut it down, the sentiment flag can hang over the edge of the paper and still fit in an envelope.


 Supplies & Instructions
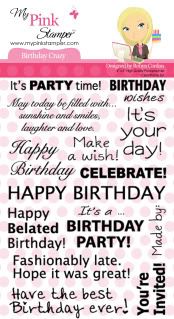
Stamp Set: My Pink Stamper - Birthday Crazy
The perfect Stamp Set for any type of Birthday Card.


Cricut Cartridge: "Just Because" Cards
Boat on button #44 - Cut at 3"

Paper: Kraft Cardstock & Cor'dinations Paper (Sand edges to add texture)

Foam Dots: used to raise up layers of the boat to add dimension

Next Hop to Helen's blog for another 
great Birthday Project.

Blog Hop Order
(incase you get lost along the way)


Friday, March 9, 2012

Pinkalicious Blog Hop and Giveaway

Good Luck Card
 Pin It

Welcome to the Pink-alicious Blog Hop.
If you are coming from Carissa's (Sprinkled with Glitter) Blog then you are right on track. If not, then begin the hop at www.mypinkstamper.com


The theme for this challenge is: St. Patrick's Day! Think Green! Show us a card, layout, mini book, party idea, home decor--anything! 
I had alot of fun creating this clover leaf. I cut 4 - 1 1/2" hearts from 2 different colors of paper. The top layer I scored and folded in half. Then adhered it with 1/8" score tape to hold down the center fold. I topped it off with a rhinestone that I colored with a green Copic Marker.


Instructions and Supplies
Card Base: 5 1/2" x 5 1/2"
Card Layer: 5" x 5"
Cuttlebug Embossing Folder: Seeing Spots - then sand the spots
Cricut Cartridge: Home Accents
Cut 4 - 1 1/2" hearts from 2 different colors of paper = total of 8 hearts
Sand the edges of hearts
Fold and Score the hearts that will be on top
Rhinestone: Color with green Copic Marker
Twine: PaperTrey Ink
Paper: Green - Core'dinations (3 shades of green)
Kraft - PaperTrey Ink
Round corners
Pen: White
Ink: Stazon - Timber Brown


Stamp: My Pink Stamper - Fancy Phrases Stamp Set
To see all of the My Pink Stamper stamps, click HERE.

Today I have a give away for you. 
My Pink Stamper - Encourage Me Stamp Set
This is large stamp set with great sentiments to make anyone's day special.
For a chance to win: Leave only one comment at the end of this post. 
Tell me what your favorite part of Spring is. I love getting to know my readers. 

Spring is my favorite season in the Midwest, United States. I love it when the weather begins to warm up, the flowers start to emerge out of the ground, and the trees being to bud. I love flower beds and I can't wait till it is warm enough to get outside to clean up my flower.

I will draw a winner on Tuesday.


Your next place to hop and be inspired is Andrea (Divine Domesticity)
Here is the Blog hop order in-case you get lost along the way.


Blog Hop List--March

Thank you for visiting Simple Creations Paper Crafts! 
Come back again soon for more inspirational projects.

Angela

Thursday, February 23, 2012

Butterfly Card - Thinking of you


Pin It


This card was created for the Fantabulous Cricut Challenge for this week.

Click on the challenge description above, to go the Fantabulous Cricut Challenge and join the fun.


I had an old shirt that had holes in it. Lately I have been saving old clothes, in-case I can use them in a project. So I cut the bottom hem off this pink shirt.


I put score tape across it near the hem stitching.


 Then I carefully folded the fabric back and forth as I adhered it to the card. Then I tucked under the end and adhered it. After that I found some ribbon that I wrapped around the card to finish off the pleated fabric, and tied a bow.


 Stamp- My Pink Stamper's - Fabulous Phrases Stamp Set
To see all My Pink Stamper Products, click HERE.


Butterfly and Cage cut from the Cricut using Bloom Cricut Cartridge. Cut at 2 3/4 inches. I used Core'dinations paper for the cuts. Then accented them with Crystal Stickles and Recollections Rhinestones. The butterfly had foam adhesive under the middle and the wings folded up to add dimension. The top of the cage had foam adhesive but the bottom of the cage I used score tape since the fabric raised that part of the card up.


Thank you for visiting my Simple Creations. 
Come back again for more projects created with a Cricut Machine and stamps.

-Angela

Friday, December 16, 2011

My Pink Stamper 12 Days of Christmas - Video & Challenge

Robyn at My Pink Stamper is celebrating 12 Days of Christmas. The design team has made some special holiday projects & videos to share with you. Each day there is a new video and challenge for you to join. Check out all the fun at www.mypinkstamper.com

Nativity Card using Christmas Wishes Stamp Set


Card Instructions
Card Base: 10.5" x 5.25"
Emboss the front of the card using: Swiss Dots - Cuttlebug Embossing Folder
Cut the following out using a Cricut Machine and Paper Doll Dress Up Cricut Cartridge
Nativity - 3"
Sheep - 2.25"
Donkey - 2.25"
Camel - 2.25"
Manger - 2.5"
Baby Jesus - 2.5"
Cut the following out using a Cricut Machine and Christmas Cricut Cartridge
Star - 3.5"
After cutting out everything use a sanding block or ink to distress the edges so the whole image will appear better. I sanded Core'dinations paper because the core of the paper is another color so it creates a nice effect. On the other papers I used Tea Dye ink from PaperTrey Ink. Then I stamped "Silent Night" using My Pink Stamper's Christmas Wishes Stamp Set. The stamp paper can be adhearded to the inside of the Nativity Stable. I adhered all the pieces using Scotch Quick Dry adhesive & foam squares. You need a strong adhesive so the paper will stick to the embossed card base. Sorry when I shot my video of this card, my camera batteries weren't charged. So it died about 4 times, because I would charge them for about an hour and then film some more. So I'm sorry the video is a bit pieced together but most the details are there.


Go to www.mypinkstamper.com to join the challenge for today. 
Create your own card with a Holiday Scene.


Friday, November 11, 2011

My Pinkalicious Blog Hop - November Scrapbook Page


Pinkalicious Blog Hop - November
Love Scrapbook Page using My Pink Stamper's "From the Heart" Stamp Set.

Welcome to the Pinkalicious Blog Hop. This is where all the My Pink Stamper Designers get to show off our projects using My Pink Stamper High Quality Photo Polymer Stamps. This month we wanted to show you how to use stamps on Scrapbook Pages or Mini Albums. If you are just starting to Hop, then go back to the beginning at Robyn (My Pink Stamper). If you have hopped here from Renee (RockinRenee) then you are in the right place.


I love how all these papers came together. The Striped Pattern paper is from a Christmas Paper Pack. It's amazing how you can pull different papers together to make a great layout.


I used border punches from EK Sucess to create a story book feel & accented it with We R Memory Keepers - Blue Lagoon - Baker's Twine.


Love is Cut from:
Sweethearts Cricut Cartridge
Button #3 at 2 1/2"


This is a beautiful stamp. I love how elegant "love story" is. This stamp set includes four different sized heart stamps. Great for accents anywhere.


Another elegant stamp. I've learn it is very simple to incorporate stamps into everyday scrapbooking.

The Couple is cut from:
Sweethearts Cricut Cartridge
Button #4 at 4"
 
The Heart is cut from:
Sweethearts Cricut Cartridge
Button #4 using Shadow feature at 2 1/4"

Supplies
Cricut Cartridge: Sweethearts
Stripe Pattern Paper: O Christmas Tree Paper Pad by My Minds Eye
Blue & Green Paper: Glitz & Glam Paper Pad by Core'dinations
Burgundy Paper: Nostalgia Paper Pad by Core'dinations
Baker's Twine: Blue Lagoon by We R Memory Keepers
Border Punches: EK Sucess 

How about a GIVEAWAY?

I would like to give someone this notebook & pen. For a a chance to win, leave me a comment (only one comment per person, please). Tell me what your favorite Holiday tradition is. I will be picking a winner Monday. Also, please include a way to get ahold of you.

This notebook was made using My Pink Stamper's Sweetest Cupcake Stamp Set, Sweet Treats Cricut Cartridge, and PaperTrey Ink Paper.

Now continue Hopping to more amazing projects. Your next stop is Cristi.
If you get lost along the way, I included our hopping order below. When your finished go back to www.mypinkstamper.com to join us for this challenge.


Friday, October 14, 2011

Pinkalicious Blog Hop - Cherry on Top Party Favor

Cherry on Top
Cupcake - Party Favor

Welcome to the Pinkalicious Blog Hop. This is where all the My Pink Stamper Designers get to show off our projects using My Pink Stamper High Quality Photo Polymer Stamps. If you are just starting to Hop, then go back to the beginning at Robyn (My Pink Stamper). If you have hopped here from Andrea then you are in the right place.


Supplies & Instructions
Cricut Cartridge: Sweet Treats
Cupcake Party Favor - Button #4 - Party Favor - Cut at 4"
Tag - Button #4 - Tag - Cut at 3.25"
Pen: Sakura White Gelly Roll
Paper: Paper TreyInk & Core'dinations
Paper Filler
Ribbon
Twine

Thank you for checking out my project and I hope I inspired you with this Simple Creation. The next stop on the Hop is Renee (RockinRenee). If you lose your place along the way, see the Blog Hop Order is below.

Blog Hop Order
 
 June


Friday, August 12, 2011

My Pink Stamper Pink-alicious Blog Hop

Welcome to Simple Creation's and My Pink Stamper's Pink-alicious Blog Hop. If you came from June then you are right on track. If you are just begining the hop, then go to www.mypinkstamper.com to start at the beginning.


Hi, I'm Angela.  I want to start off sharing a bit about myself so you can get to know me. I love to craft and do anything with my hands. I get to stay home with our two little girls. They keep me very busy so I try to craft during nap time or when I get a chance. My four year old crafts with me and knows how to use every tool.

God is a huge part of my life. My husband and I are pastors at an amazing church. I am very involved with the Nursery, Young Adults, Worship Team and run our Young Adult Cafe. So even though I "stay home" life is always busy, but I love what I do.

I love to craft with my Gypsy, Cricut Expression, Cuttlebug, Stamps, & Copic Markers. My favorite paper line is Core'dinations because it cuts so well on the Cricut and then I can sand it to accent another color. I love the quality of My Pink Stamper Stamps. They stamp so well & work with both Scrapbooking & Card Making. I am honored to be on this design team for a second term and look forward to getting to know you more. I love reading all your comments.


Supplies & Instructions
Cricut Cartridge: Straight From the Nest - button #33 - cut at 3"
Cuttlebug Embossing Folder: Seeing Spots
Ink: Stazon - Timber Brown
Embelishment: Glossy Accents
Twine: PaperTrey Ink
Paper: Raisin Boat & Core'dinations
Pen: Sakura White Gelly Roll


Wednesday, August 10, 2011

My Pink Stamper-NEW Release-Samples

Holloween Treat Bag


I made this cute little Goodie Bag with My Pink Stamper's NEW Spook-alicious Stamp Set

Supplies & Instructions
Tags, Bags, Boxes & More Cricut Cartridge
Bag - 6" - button #33
Tag - 1.75" - button #9
Create A Critter Cricut Cartridge
Pumpkin - 2.25"
Paper: Dream Street Papers LLC. - Sam-Hoot Hoot
Core'dinations
Twine: Paper Trey Ink

See all the NEW Releases & Design Team Samples at www.mypinkstamper.com

Visit back, Friday, Aug. 12th @ 8pm (CST) for our Pink-a-licious Blog Hop
The Blog Hop begins at www.mypinkstamper.com Friday Evening.