Wednesday, October 26, 2011

My Memories Digital Software WINNER!

It's time for a GIVEAWAY!  My Memories created an easy to use Digital Software program for us to get caught up on our Scrapbooking. I know I make lots of cards and my scrapbooking hasn't gotten touched in a while. This is a great tool to get those unfinished books completed. My Memories let me review the program for all of you & also gave me one to give away.

The lucky person to win My Memories Digital Scrapbooking Software is.....

Pat N.

If you didn't win today, don't worry about it. I have another opportunity for you. I have a coupon code for $10 off the software. And let me say it is already affordable to begin with.
To purchase it for yourself click on the button
and use the following coupon code:

STMMMS99475

To see my full review on this great product, click HERE.


Wall Vinyl Verses


My mom is remodeling her bathroom. 
So she had me make some verses in vinyl to decorate the walls.


I love designing on my Gypsy when I cut vinyl so that I can see exactly what it will look like before I cut it.

I purchase my Vinyl from Expressions Vinyl because they have great prices and it is the best quality of vinyl. I have a button on the right side of my blog you can click to shop all their great products.


From the Heart - Happily Ever After Card & GIVEAWAY till 4pm

Happily Ever After
My Pink Stamper just released new stamps sets last Friday. 
For this Card I used her new "From the Heart" Stamp Set.
Check out all of the new stamp releases HERE.
Check out more projects using this stamp set HERE.


Supplies & Instructions
Cricut Cartridge: Sweethearts
Car - button #34 - Cut 3.5"
Stamp Set - My Pink Stamper - From the Heart
Twine
Stickles
Glossy Accents

I designed this card on my gypsy. There are alot of pieces and I wanted them different colors. So rather than cutting a lot of extra pieces that I didn't need to get several different colors, I hid the cuts I didn't want. Also I cut out the bumper with an exacto knife so that the black would show through it. So even though this is a detailed card, I tried to make it as simple as possible.

I have a GIVEAWAY going on UNTIL 4PM (CST) TODAY!
I am giving away a Digital Scrapbooking Program by My Memories.
Check out the Giveaway post, HERE.


Tuesday, October 25, 2011

My Pink Stamper Oct. Blog Post

Ginger Bread Man Card Set

Welcome to the My Pink Stamper October Blog Post
I have a craft fair coming up so I wanted to make alot of Christmas Cards. So I am making several packages of cards. Each package will contain 6 cards that are all the same. The first package I made with a Ginger Bread Man because this was the perfect stamp for it.


 If I make this card set again I think I will find something like a Viva Decor Pen to make all the details with. there were just too many little pieces.

 Stamp from My Pink Stamper's Winter Treats & Sayings Stamp Set. This is a great Holiday Stamp Set with so many different sentiments to make the perfect card with. To check out all of the My Pink Stamper Stamps, click HERE.

 I packaged 6 cards with envelopes in a plastic card box from PaperTrey Ink. It is so hard to take a picture of something shinny without getting a glare. But in person the plastic case makes these cards look even nicer.

I finished off the card box with this Tag and another great stamp from My Pink Stamper's Winter Treats & Sayings Stamp Set.

Supplies & Instructions
Cricut Cartridge: Winter Frolic
Ginger Bread Man - button #34 - Cut at 3.5"
Tag - button #34- Cut at 2.25"
PaperTrey Ink: Paper, Plastic Card Box, Twine 
Cuttle Bug Embossing Folder
White Pen

Now you can check out all the amazing projects the design team has made at www.mypinkstamper.com

Also, I have a GIVEAWAY going on till Tomorrow (Wednesday). I'm giving away a My Memories Digital Scrapbooking software. Click HERE to see the give away post, a review of the product, and for a chance to win. If you don't win, I also have a coupon code for $10 off the software. It was a really easy program to use and it had so much to choose from.


Friday, October 21, 2011

New Release & my daughter's project

My Pink Stamper released some AMAZING stamps today. After reading my post go check it out. See all the great NEW stamp sets and the Amazing projects the design team made. They are so much fun to work with.
Click HERE to see the NEW stamp release.

Now I want to share something my 4 year old daughter made. I was so proud of her, that I wanted to share it with you.


 She made this cute little Snowgirl on a sled with my Cricut, then Stamped with a My Pink Stamper Stamp, and of course she had to write her name at the top. (she is in pre-school)


 My favorite part is that she asked to use my White pen. Then I watched her make foe stitch marks just like mommy does. I was so proud of her.


Then she wanted her picture with her project. So Cute!

Supplies & Instructions
Cricut Cartridge
Winter Frolic - cut 4"
Stamp


Also I am having a GIVEAWAY until next Wednesday, Oct 26th. I have a My Memories Digital Software that I am giving away & if you don't win, I also have a coupon code.
Check out the GIVEAWAY HERE.

Thursday, October 20, 2011

Scrapbooking Software GIVEAWAY, Review, & Coupon Code


Is anyone else behind on Scrapbooking? I know I am! I spend most my time making cards because they are quicker & I sell them. Well, I have a solution for you today. There is a very simple Digital Scrapbooking Software called "My Memories." They were so gracious to let me try out the product so I can give you an honest review of it. Here are two layouts that I made with it. The first I used a template from My Memories, then added my pictures and the the title. The second layout I made from scratch. I chose the paper, boarder, embellishments, word art and added my pictures.

Created with a Template


Designed by Myself

The My Memories Scrapbook Software was easy to use and lots of choices to design with. You can make a whole Scrapbook Album quickly by choosing a Template that has already been created and then you add your own pictures into it. Or you can design each page just the way you want with every detail.

It wasn't difficult to learn the program. Within a little amount of time I felt like I had a good grasp of the program and could design efficiently. It was fun choosing the pattern paper, colors, brads, ribbon, font, styles, and flowers. The possibilities are endless. The best part was, there was no clean up. Since it is a digital program everything is on the computer. NO tools, papers, adhesive EVERYWHERE. I love crafting but I don't enjoy cleaning up my mess just so I can make something else. Creating with this program is a great solution for the mess. You can even save it and work on it more later.

For all the tools and embellishments this software comes with, it is a GREAT PRICE. But your not stuck only designing with the same paper over and over. They have so many downloads you can buy or even alot of free downloads to chose from. So every album or scrabook page can look just the way you want it to.

Today is your lucky day. I have a coupon code that will give you a $10 discount on the purchase of the MyMemories Suite v2 scrapbook software. (The software also comes with a $10 coupon for downloads-a total value of $20)

Click HERE to check out the My Memories Suite Scrapbook Software for your self.


Use this Coupon Code: STMMMS99475

My Memories even gave me one Free software to give away to one of my followers. To enter in the GIVEAWAY go to www.MyMemories.com and choose your favorite digital paper pack or layout, then come back to this post and let me know which one you chose.

Please, only one comment per person. 
I will pick a winner next Wednesday, October 26th using Random.org

If you have any questions about the program leave me a comment and your email address so I can reply.


Friday, October 14, 2011

Pinkalicious Blog Hop - Cherry on Top Party Favor

Cherry on Top
Cupcake - Party Favor

Welcome to the Pinkalicious Blog Hop. This is where all the My Pink Stamper Designers get to show off our projects using My Pink Stamper High Quality Photo Polymer Stamps. If you are just starting to Hop, then go back to the beginning at Robyn (My Pink Stamper). If you have hopped here from Andrea then you are in the right place.


Supplies & Instructions
Cricut Cartridge: Sweet Treats
Cupcake Party Favor - Button #4 - Party Favor - Cut at 4"
Tag - Button #4 - Tag - Cut at 3.25"
Pen: Sakura White Gelly Roll
Paper: Paper TreyInk & Core'dinations
Paper Filler
Ribbon
Twine

Thank you for checking out my project and I hope I inspired you with this Simple Creation. The next stop on the Hop is Renee (RockinRenee). If you lose your place along the way, see the Blog Hop Order is below.

Blog Hop Order
 
 June


Handmade Halloween Costumes

 Provo Craft made some great Handmade Halloween Costumes for me to share with you.

Halloween Mask
Flower Child Costume
Smarty Pants
Pizza Chef Costume


Halloween Mask


Instructions:

1.      Cut mask at 3.5 from black cardstock and emboss with Happy Hauntings embossing folder.

2.      Cut two more masks from purple cardstock at 3.5 and place behind black mask; one off-centered to the top and left, and one to the bottom and right to create a shadow. 

3.      Stitch around edges.

4.      Cut spider web at 3.5 from gray cardstock. *Tip: Cut 3 of them and stack  them for extra support. 

5.      Embellish with gems. 

6.      Cut spider at .75 from black cardstock and adhere to web with black foam adhesive. 

7.      Add web to mask with black foam adhesive.

8.      Cut a spider at 3 from black cardstock. 

9.      Add black button to head and embellish eyes with gems. 

10.  Add large button to body that has thin purple paper strips run through holes for thread. 

11.  Adhere to mask with black foam adhesive.

12.  Punch hole in each side of mask and run black elastic lace through; knotting at back of each hole.


What you’ll need:

Provo Craft Supplies:


·         Cricut Expression Machine

·         Cuttlebug Machine

·         Cricut Chic and Scary Cartridge

·         Happy Hauntings companion set embossing folders


Other Supplies:

·         Cardstock (black, purple, grey)

·         Sewing supplies

·         Black foam adhesive

·         Buttons and gems


   Flower Child Costume

Instructions:
1. Cut flowers and circles from each color of vinyl; 5 of each piece at 4.41 inches flowers and 1.59 inches for circles.
2. Adhere vinyl shapes to jeans and t-shirt; mixing colors of centers and flowers.
3. Add solid vest and handkerchief headband to finish flower child costume.

What you’ll need:

Provo Craft Supplies


·         Cricut Expression

·         Gypsy Handheld Device

·         Cricut Vinyl -  Burnt Umber orange, Ice Blue, Lilac Purple, Lime Green, Yellow, Ruby Red, Rose Pink

·         Cricut Classic Font- cut at 4.41 inches (remove tag holes), 1.59 inches. (Cut out flowers and smaller circles, adhere to clothing as desired, using smaller circles for centers of flowers on pants, and using flower centers in flowers on shirt.)


Smarty Pants Costume

 Instructions:

                1. Use Cricut Vinyl and Cricut Expression to cut out letters for t-shirt.
                2. Peel off backing and adhere to shirt as shown.
                3. Brush hair into middle part, add thick rimmed glasses and pull pants up over waist.

What you will need:

Provo Craft Supplies:


·         Simply Sweet Cricut Cartridge – “I” “M” “C” letters at 2.57 inches. 2 at 1.73 inches. ii ( for equal sign) at 1.21 inches

·         Baby Steps Cricut Cartridge - heart at 2.53 inches

·         Cricut Vinyl colors- Raven and Ruby Red

Other Supplies:

·         T-shirt


Pizza Chef Costume


Instructions:


1. Using scissors, cut red fabric to a 12" x 12" square and follow the package directions to apply Heat N' Bond Ultra to wrong side of fabric with an iron. Place fabric face down on mat. Apply a few strips of masking tape around the edge of the fabric to prevent it from lifting and sliding while cutting.

2. Load the Deep Cut Blade into your Cricut Expression machine and set blade depth to 6. Using the Plantin SchoolBook cartridge, cut multiple 1.10" squares from red fabric.

3. Adhere squares to the apron and brim of chef hat in a checkerboard pattern using an iron.

4. Next, use the Gypsy device and Lite Billionaire cartridge to weld together the letters to spell the word "Pizza". Cut two words from black vinyl, one at 3" for the apron and the other at 1.9" for the hat. Apply to apron & hat with transfer tape and tools from Cricut Tool Kit.

5. Using the Lite Billionaire cartridge, cut a 0.90" mustache from black vinyl.

6. Place apron and hat on child. Have child wear the vinyl mustache.

7. Using the Simply Charmed cartridge, cut the pizza slice and all of its layers from cardstock for a costume accessory. Laminate with the YourStory machine for durability, if desired.


What you’ll need:

Provo Craft Supplies:


·         Cricut Expression Machine

·         Gypsy Handheld Design Device

·         Deep Cut Blade

·         Cricut Tool Kit

·         Plantin SchoolBook Cartridge

·         Lite Billionaire Cartridge

·         Simply Charmed Cartridge

·         YourStory Machine

·         Cricut Vinyl – Raven

·         Cricut Transfer Tape


Other Supplies:


·         Laminating Pouches

·         White Apron

·         White Chef Hat

·         Red Fabric

·         Heat N' Bond Ultra

·         Cardstock for Pizza (Tan, Black, Orange, Dark Red, Green)

·         Adhesives

·         Masking Tape

·         Scissors

·         Iron


     Now that you have check out all these great projects that Provo Craft made for me to share with you.....come back tonight for our Pinkalicious Blog Hop. It begins at www.mypinkstamper.com at 8pm (CST).


Thursday, October 13, 2011

Homemade Apple Butter


This will be the third year that I made Homemade Apple Butter. I make it to sell and for Christmas Gifts. So far I've made 8 crock pots of it. Hopefully that is all I need to make this year. Click HERE to see the recipe I use from allrecipes.com.
Each year I try to make a cute tag to dress up the jar with.

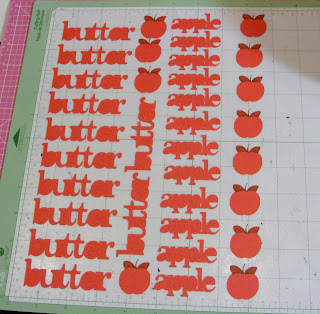
By designing it on my Gypsy I can cut a lot at one time.
 The apple cut is attached to the tag cut. So to get the most cut at once I hide the tag and place the apples close together. Then for the tag cut, I hide the apple to get the most cut at once.


 I color the leaves and stems of the apples with my Copic Markers to add more detail.
I used Copic Markers G94, YG03, YG17.


Front of Tag

Back of Tag
On the back of the tag I stamp a special massage of it's Yummy Goodness from My Pink Stamper's - Yummy-licious Stamp Set. I also write on the tag when I made it so they can know.

Supplies & Instructions
 Cricut Cartridge: Preserves
Tag: Button #4 cut at 4"
Apple Butter: Buttons #4 & #7 cut at 1"
Adhesive: ATG & Zig 2 Way
Hole Punch
Ribbon

Stop back by tomorrow for our Monthly Pinkalicious Blog Hop & Challenge. 
It begins at www.mypinkstamper.com at 8pm (CST)

Wednesday, October 5, 2011

Child of God - Vinyl Wall Art

I had a customer ask me to make this wall vinyl for her grand baby's room. I love what she wanted it to say. I designed it all on the Gypsy so I could line everything up, just how I wanted, and see what it would look like before I cut it. I used the "Kiss Cut" settings on my Cricut - blade 3, pressure 3, speed 3. With those settings it will only cut through the vinyl and not the backing.


A well used Cricut Pick to remove the centers of the letters
Supplies
Gypsy
12"x24" Cutting Mats
Cricut Expression
Vinyl - The Paper Studio - from Hobby Lobby (Cut well)
Cricut Pick (to remove the centers of the letters)
Opposites Attract Cricut Cartridge - Cut at 2"