Tuesday, March 22, 2011

My Pink Stamper Design Team Post - March

Spring Scrapbook Layout


This scrapbook layout was a lot of fun to make. I knew I wanted to make it fun and springy. I originally wanted to use bolder colors but these colors looked the best together. Sorry, I have a hard time taking pictures of 2 page layouts. If you have any tips on that, please leave me a comment. Most of the paper is Core'dinations. I love how well it cuts on the Cricut with the blade at 6 and the pressure at 6. I also love how you can sand or distress the Core'dination paper to see the different core color. They come in amazing colors, too. Ok, now that you know what my favorite paper is, I will get back to my layout.


 Cloud with Bird - Create A Critter - 3"
Spring - Gypsy Wanderings - 2.5"


Flowers - Live Simply - 2.5"
These flowers had so many layers & I couldn't figure out how they were suppose to go. So this is my version of them.


 Flower Frame - Live Simply - 4"
Stamp - Familes are Forever - My Pink Stamper Everyday Life Stamp Set
Tip on putting this flower together: The dashes are a little difficult. I learned if I use the piece of paper that all the dashes were cut out of, I can lay it over the flower and know exactly where to put each dash mark. I even drew a line on paper where I started gluing the first dash mark. The reason this is a little more difficult is because the yellow circle is wider in some spots. So there are narrow and wide pink dashes. You also don't want to end up with extra space and have all your dashes glued down. But this flower is such a beautiful cut. Hope this tip makes since and is helpful.


 Butterfly - Live Simply - 2"


 Frame - Live Simply - 4"


 Tree - Simply Charmed - 6"


Sun - Create A Critter - 3"
Clouds - Create A Critter - 2"

Accented Layout with
Martha Stewart Opaque White Marker 
(it was a little transparent and wider than a pen, just the look I wanted)
Stickles - Star Dust

Thank you for visiting my Simple Creations. I hope you enjoyed my spring layout and are inspired to create. Visit Back Soon for more Simple Creations.

To see the rest of the design team's amazing layouts, go to mypinkstamper.com

Tuesday, March 15, 2011

Swing Card for Card Swap

I participated in my first card swap. I received an awesome package yesterday with all the cards. I wanted to share with you the card I made. It was just a different color scheme for a swing card I made on a previous post.
Check out the instructions and a video HERE.


Friday, March 11, 2011

My Pink Stamper Pink-alicious Blog Hop

Easter Layout

If you are just beginning this blog hop, please start at MyPinkStamper.com 
If you are coming from 
Edna's blog then you are in the right place.

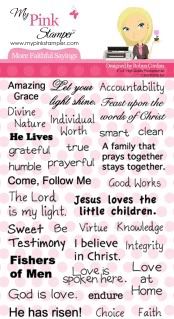
I made this Easter layout with Spring Colors and My Pink Stamper's More Faithful Sayings Stamps. I love how it turned out.

Grass was cut from Gypsy Wanderings Cricut Cartridge. Shift and it is button #42. Cut at 1.5". To create the solid grass piece across the bottom of the layout. I welded 6 grass sections together, on my gypsy, so they overlapped a little.

Basket from Doodlecharms Cricut Cartridge and cut at 2.50"
Eggs from Doodlecharms Cricut Cartridge. Large cut at 4" and Small cut at 2"
I used Glossy accents on the Eggs and Baskets. They are on pop dots so, when I applied the glossy accents the eggs curled up and made them more round like an egg.

Cute bunny!
From Create A Critter Ciruct Cartridge and cut at 2.50"

Easter was created on my Gypsy using the Alphalicious Cartridge Cricut Cartridge at 1.40". I welded the shadow letters together, angling them how I wanted to. Then I laid the normal letters over the top and lined them up just right over the shadow. Then welded the top layer together also. This made gluing them down much easier because the top layer was all one piece and the shadow was all one piece. Then I used Glossy Accents on the word to make it shinny.

I curved the stamp "He Lives" on my stamp block to stamp around this circle. The inside of the circle is a piece of Vellum that I scored lines in on my Martha Stewart Score Board to make guides to journal on. I love how it turning out. I chose to use Vellum here because I loved the patter paper and wanted it to show through.

I stamped several stamps from MPS - More Faithful Saying's Stamp Set. I lined up each side on a long acrylic block to stamp each side all at once. Then I layered it with brown paper and accented with pen stitches. Now they are ready for pictures.

Supplies Used
Pattern Paper - The Breathe Paper Collection from Prima (bought at Big Lots)
Alphalicious Cricut Cartridge
Create A Critter Cricut Cartridge
Doodlecharms Cricut Cartridge
Glossy Accents
Stazon Ink - Timber Brown
Sakura Gelly Roll White Pen 
Pop Dots

Hope you enjoyed my layout. I love all your comments and read everyone. Please come back again for more Simple Creations. I love sharing projects with you.

Next hop to:
Tracy—Craft Junkie Too
When you are finished return to My Pink Stamper to join in the fun.


TONIGHT - Pinkalicious Blog Hop - 8pm CST

Tonight is our Pinkalicious Blog Hop
It begins at 8pm CST.
The hop begins at Robyn's blog,  
Start there to see all the design team's projects, 
then hop back to Robyn's blog to join the challenge fun.


Friday, March 4, 2011

Vinyl Storage Tip

I have an amazing tip for how to store vinyl cuts that you don't want on your walls all the time.  Save your old Cricut Mat Covers!!!  Use them for a backing for vinyl cuts waiting between seasons. It is hard to capture it in a picture so I will tell you about it. I took 2 Cricut Mat Covers, (because this was so large) then took transfer tape & taped the mats together on the back. Then I used transfer tape to remove this off my wall & put it on the Cricut Mat Covers. Of course I did it in 2 sections, because my tree wasn't sideways on my wall, but that was how it fit best on the Mats. Just leave the transfer tape on top of it & then it is ready to put back on your wall next year.


HERE is the original post with details of how I made this Vinyl Project.
By the way if you like working with vinyl, I found a great company with great prices. Click on my link on the right side of my blog for ExpressionsVinyl.

Copic Creations Challenge #45 - Complementary Colors

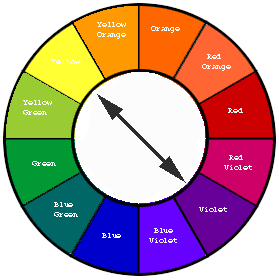
Complementary colors are found on the opposite sides of the color wheel.  So I created my card using Purple & Orange.  I am new at coloring with Copic Markers but they are so much fun & I am learning as I go.


Supplies Used
Copic Markers
YR04
YR68
Y38
V15
V91
Giraffe Stamp - Baby Animals - Inkadinkado
Sweet Baby Stamp - Daily Designs Sentiments - Paper Trey Ink 
Purple Paper - Core'dinations
Orange Paper - Lion Sleeps - K&Company
Ink - Memento - Tuxedo Black
CuttleBug - Embossing Folder