Showing posts with label Copic Markers. Show all posts

Friday, June 22, 2012

Pinkalicious Blog Hop - Stamp Release

4th of July Frame

Welcome to the My Pink Stamper Pinkalicious Blog Hop. 
If you are just beginning then start at www.mypinkstamper.com
If you are coming from Edna, then you are right on track.

I will warn you that this has alot of pictures in it but 
I wanted to show you each step in making this frame.


 Start with a bare wood frame.
I found this one at a yard sale.
Painted it with a water base red paint.

 Lightly paint some of the frame White using a straight edged paint brush.
I love look of distressed Americana decorations.
Sand frame till it looks the way you want.
I just found some sand paper we had at the house.
It was 180 grit and it worked great.

 Supplies & Instructions
 Stamps from My Pink Stamper - Yankee Doodle Stamp Set
Ink Pad - My Pink Stamper Serendipity Skies
Use Copic or Pro-Markers to color, then cut out.
Adhere using Scotch quick dry glue and foam squares.
Cricut Cartridge: Stand and Salute
Large Star: 2"
Small Stars: 1"
God Bless America: 2.4"
The sizes may change based on the size frame you work with.

Links for Products
  • The Yankee Doodle Kit and Darkest Night Ink Pad will go on sale at 12pm CST at Pumpkin Spice Shop. They sell out quick so be sure to get yours.
  • For more Projects done with these great stamps, visit My Pink Stamper, HERE.
  • To purchase the Yankee Doodle Kit, visit Pumpkin Spice Shop, HERE.
  • To Purchase a Darkest Night Ink Pad click HERE
  • They will be giving Yankee Doodle Kit away, so check out the details at My Pink Stamper, HERE.


Next hop to Chelle's Blog 
to check out her amazing project.

Blog Hop Order

Tuesday, May 29, 2012

May Design Team Post

Shopping Notebook w/ Pen

 Stamps Used: My Pink Stamper - Girlie Doodles and Girlie Sayings

These stamp sets work great together. Then I colored the purse with Copic Markers.

Inside: 4x6 Sketch Pad Notebook


4" x 6" Notebook w/ Pen
Sketchbook: 4"x6" (from Staples)
Cover: 9 5/8" x 6 1/8"
Score:  5", 4 1/2", 4 1/8"
Cut 2 slits 1" apart to hold R.S.V.P style pen (from Staples)
Score every 1/8" along pen opening to help it bend evenly.
Note: the score marks are 3/8" and 1/2" to make a larger opening for the larger pen. If using a MINI Pen score 3/8" and 3/8" apart and trim off extra in length. These numbers are just guides to give you an idea of how to make it. 

To see more projects from the amazing My Pink Stamper Design Team, go to www.mypinkstamper.com

Wednesday, May 23, 2012

My Pink Stamper Girlie Doodles and Girlie Sayings

I wanted to show you two stamp sets that go great together. They are the My Pink Stamper Girlie Doodles and Girlie Sayings. To check out more My Pink Stamper Products, click HERE.

Card
Cricut Cartridge: Art Philospophy
Card Cut: 4"
Layers Cut: 3.7"
Inside White Layer Cut: 3.5"
 Colored with Copic Markers
 
Small Card
 Colored with Copic Markers
 
Gift Card Holder
Created using an envelope cut on the Cricut Expression
 Colored with Copic Markers

Gift Card Holder
Created using an envelope cut on the Cricut Expression
Colored with Copic Markers


Tuesday, May 22, 2012

Birthday Card Set

Birthday Cards

Made with My Pink Stamper's NEW Image Type "Birthday Doodles" Stamp Set
Robyn of My Pink Stamper just came out with some great products last week. New "Image" type stamps that can be colored in. Her very own line of ink pads, that stamp very well. They are my new go to stamp pads. Along with several more great products. This stamp set is only sold in a kit at the Pumpkin Spice Store. They sold out over the weekend but will have more in, in a couple weeks. So after seeing this post go to My Pink Stamper to see all the great new products released this past week. Then go to the Pumpkin Spice Shop to order your own Kit with the Birthday Doodles Stamp Set. All shipping at Pumpkin Spice Shop will be on hold from May 25-June 8. They had an unexpected death in the family and have to travel out of the country.


To create these cards I started with a Kraft Cardstock as the base, then found some fun birthday balloon pattern paper. I cut several circles and scallop circles, different sizes with my Cricut Expression. I colored the stamped image from Birthday Doodles with Copic Markers. Then I accented the cards with twine. Finally I put all 3 cards with envelopes in this clear card box, from PaperTrey Ink. I plan to sell this Birthday Card set at an upcoming craft sale.


Friday, May 18, 2012

Pinktastic Special Release Blog Hop

make a WISH - Birthday Card

Using My Pink Stamper Birthday Doodles Stamp Set


Supplies and Instructions

Copic Markers
Twine
Glossy Accents
Cuttlebug Embossing Folder
Foam Adhesive

The Birthday Doodles Stamp Set will only be sold in a Kit from Pumpkin Spice Shop. All kits go LIVE and for SALE at 12:00 PM CST!  They plan on selling out so order at noon to get the same day Priority Free Shipping before they are gone. Click HERE to order your kit.

TODAY, ONE lucky viewer will win a Kit that is being given away on My Pink Stamper!!  Hop through all the blogs then return to My Pink Stamper to win. Robyn will announce the winner LIVE at 11:45 (CST) TODAY on My Pink Stamper Live!! 
NOTE: My Pink Stamper Live begins at 11:30 (CST).

From here hop to Chelle (Paper Krate).

Blog Hop Order


Thursday, October 13, 2011

Homemade Apple Butter


This will be the third year that I made Homemade Apple Butter. I make it to sell and for Christmas Gifts. So far I've made 8 crock pots of it. Hopefully that is all I need to make this year. Click HERE to see the recipe I use from allrecipes.com.
Each year I try to make a cute tag to dress up the jar with.

By designing it on my Gypsy I can cut a lot at one time.
 The apple cut is attached to the tag cut. So to get the most cut at once I hide the tag and place the apples close together. Then for the tag cut, I hide the apple to get the most cut at once.


 I color the leaves and stems of the apples with my Copic Markers to add more detail.
I used Copic Markers G94, YG03, YG17.


Front of Tag

Back of Tag
On the back of the tag I stamp a special massage of it's Yummy Goodness from My Pink Stamper's - Yummy-licious Stamp Set. I also write on the tag when I made it so they can know.

Supplies & Instructions
 Cricut Cartridge: Preserves
Tag: Button #4 cut at 4"
Apple Butter: Buttons #4 & #7 cut at 1"
Adhesive: ATG & Zig 2 Way
Hole Punch
Ribbon

Stop back by tomorrow for our Monthly Pinkalicious Blog Hop & Challenge. 
It begins at www.mypinkstamper.com at 8pm (CST)

Tuesday, September 27, 2011

Pregnancy Card

This is a card I made a while ago and never posted it. This stamp set is perfect to congratulate a women expecting a baby. I learned a fun technique on this card. I stamped the girl on pattern paper and then cut out her shirt so it had a pattern to it. Then I stamped the girl on white paper and colored her. Then adhered the shirt on top.

Supplies
Stamps: Taylored Expressions - Jenn
Pattern Paper: gcd - Chic Bebe
Copic Markers
Buttons - PaperTrey Ink
Embroidery Floss


Saturday, June 18, 2011

Graduation Card

The hardest cards for me to make are Graduation and Mono Chromatic, meaning a card primarily with one color. The reason Graduation cards are difficult for me is because I don't have very many Cricut Cuts or Stamps to choose from. The cap on this card was cut from Wild Card Cricut Cartridge. It is actually a card and there are no layers for it. So the way I cut it is on my Gyspy, and I move it to the edge so only the front of the cap is on the mat. Then I cut it out and trim off the extra paper. So finally I figured out how to make a Graduation Cap with the Cricut Cuts I have.


Inside

Supplies & Instructions
Wild Card Cricut Cartridge
Cap - Button #42 - 5.15" (only use 1 side of the cap card)
Scroll - Button #42 icon - 5.15"
Tassel - Button #42 liner - 5.15"
Plain Paper - Core'dination
Pattern Paper - DCWV The Grade School Stack
Color Scroll with Slate color Copic Marker
Brad

A bit about me....
I have been working on alot of projects. I sell my cards, notebooks, and paper crafts that I make. Tomorrow is our Church's Father's Day Fest. Its a hug outdoor event with a service, car show, monster trucks, cook-off, live bands, and I am running a craft fair at it. I am so excited to sell projects and cards I have made. What I sell will pay for my day at CHA Chicago in July. So I am praying for a profitable day. I am looking forward to tomorrow so much! Well enough about me, I need to go make some more stuff :)

Friday, June 10, 2011

The Lord is my light!


I've been working on lots of cards and projects for a Craft Fair that I will have a booth at next week. I wanted to share this card with you because it is unique in the mixed media and I love how it turned out. Sorry about the picture quality. I took it on my cell phone.

Supplies
Cuttlebug Embossing Folder
Copic Markers
Making Memories Brad
Core'dination Paper
Corner Rounder
Color Box Chalk Ink

Check back tonight for the MPS Pinkalicous Blog Hop at 8pm CST. It begins at www.mypinkstamper.com

Thursday, May 26, 2011

Graduation Cards

Congratulations
I had an order for graduation cards and I didn't have a good Cricut Cartridge or stamp for graduations. I also didn't know what their school colors were, just their gender, so this is what I came up with.


Supplies
Wild Card Cricut Cartridge
Button #28
Card - blackout - 5"
Envelope - 5"
Congratulations - 5"
Sakura White Gelly Roll Pen
Graduation Cap - Dimensions Clear on Clear - Special Occasions Stamps
Colored the cap with Copic Markers
Blue Paper from DCWV Winter Matstack


Teacher Card

Back -2- School


I love the colors in this card. I used a Digi Stamp from Sweet N Sassy Stamps, called Pencil Holder. This is a great Digi to color for teacher cards or projects.

The paper is from DCWV the Grade School Stack. I was so excited when I bought this awesome paper at a yard sale. It is perfect for teacher cards or projects.

All About Copic Class

Copic Class

I took my first official Copic Class last week at Stamp N Scrap Ink, in Dyer Indiana with Shari Carroll.  It was alot of fun and it is nice to know that I actually am coloring right. I also learned more about the Copic Color Wheel and what markers blend well together.  Here are the cards we made that night.


This is my favorite card. Shari already had the card base cut out but I loved the elements of it. The front and back are the same shape. Then the butterfly was cut out of the front with a die cut. Then the front was embossed. I colored the butterfly with my Copics to match the yellow paper used for the sentiment. A thin piece of paper is holding the butterfly to the card. The back of the card is scored about 1" down and adhered to the front at that top section. Then I colored this flower with my Copics. I love how it turned out.


The background was stamped with a Versa Mark watermark ink pad. On this card I learned you can color a few pedals of a second flower to make leaves.


I love how this card was folded. It is a standard A2 size card but one side of the card was scored in half and then folded up to make a pocket for a gift card. Super simple. That is the easiest gift card hold I have learned how to make.

I hope you enjoyed these cards with me.
I really don't know that specifics of the supplies used.
I do know most of them were Hero Arts & Copics.


Wednesday, May 18, 2011

Hello There - PaperTrey Ink Card

 Hello There


I made this small card using PaperTrey Ink Stamps from Tag-Its #1. It was a simple small card. I also used a cuttlebug embossing folder, ribbon, Martha Stewart ink pads, and my Copic Markers.

Saturday, May 7, 2011

NSD Challenge #8 - Summer Themed Project

Join the National Scrapbooking Day Challenges at http://www.mypinkstamper.com/


Recipe
Simply Charmed Cricut Cartridge
Sun - Button #23 - 2.5"
Bucket - Button #24 - 3"
I also shaded with my Copic Markers

Friday, March 4, 2011

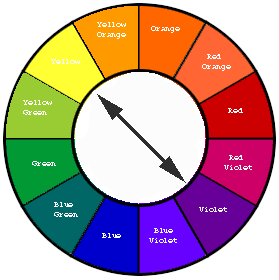
Copic Creations Challenge #45 - Complementary Colors

Complementary colors are found on the opposite sides of the color wheel.  So I created my card using Purple & Orange.  I am new at coloring with Copic Markers but they are so much fun & I am learning as I go.


Supplies Used
Copic Markers
YR04
YR68
Y38
V15
V91
Giraffe Stamp - Baby Animals - Inkadinkado
Sweet Baby Stamp - Daily Designs Sentiments - Paper Trey Ink 
Purple Paper - Core'dinations
Orange Paper - Lion Sleeps - K&Company
Ink - Memento - Tuxedo Black
CuttleBug - Embossing Folder

Monday, February 21, 2011

Fantabulous Cricut Challenge #48

This weeks challenge on FCCB was to Emboss something on your project. It could be any form of embossing. So I chose dry embossing with an embossing folder.


I made this jungle themed baby shower invitation. 

Supplies Used
 Create A Critter Cricut Cartridge - Monkey cut 3.5"
Stamp - Sweet Baby Set from My Pink Stamper
Embossing Folder - Checkerboard by Tim Holtz, Sizzix
Copic Marker - YR00 colored monkey's ears & cheeks 
Core'dination Paper - The Chocolate Box - Brown with Green Core
Stazon Ink - Jet Black
Pop Dots
Head over to the Fantabulous Cricut Challenge Blog (FCCB) to join this fun challenge and make your own Emboss It project.

This will be my last project, designing this term, for the FCCB. It has been so much fun sharing my projects and getting to know all of you. Robin, thank you for this opportunity. This was the first design team I have ever been on. I learned so much & was challenged in my projects. Thank you for stopping by my Simple Creations & please visit back often.


Monday, February 7, 2011

Fantabulous Cricut Crawl- Share The Love!

Sweetheart Card - Love Is Life
 
Welcome to Simple Creations and the fourth Fantabulous Cricut Crawl...Fantabulous Cricut's version of a blog hop! 

Valentine's Day is in a week and everyone at Fantabulous Cricut has decided to Share the Love!   Each Design Team member will be featuring an original Valentine-themed project that includes the word LOVE somewhere on it.

If you've come from visiting  Andrea at http://divinedomestic.blogspot.com, you're in the right place! If you've just happened across my blog and would like to play along with our Fantabulous Cricut Crawl, start HERE.

Make sure to check out each DT member's blog for some awesome inspiration! There will be PRIZES along the way at some of our DT members' blogs, AND there will be a Grand Prize up for grabs at FCCB for one participant that submits a "Share the Love" project at FCCB!
How fun is that?

For my project...


 I curved this stamp on my block to stamp it around the circle.

 I copied this cut 4 times on my gypsy. In each cut I hid some of the cuts using this button under the advanced tab on my gypsy. I cut the hair and shoes in brown, their shirts in white, the silhouette in a pale cream color, then his pants in brown and her skirt with a patterned pink paper. This is how I was able to cut out so many colors with out repeating the same cuts over and over. I LOVE MY GYPSY! I waited 2 months to get it replaced and I didn't know how to function and create without my GYPSY. Sometime I will do a post all about why it is a Must Have.

 I shaded the cuts with my Copic Markers. I have only ever used them on white paper. I love how it made the card come to life and added detail by shading a bit. Then I gave her a stickle earing & ring.

Stamps
Love & Love is Life are both from My Pink Stamper's Love-alicious Stamp Set. These stamps are made from an amazing quality & stamp so clearly. She just released 10 new stamps sets. Check them out HERE.

 Cricut Cuts
Wild Card
Card base-blackout-4.75"
Just Because Cards
Circle-real dial size-3.91"
Frame-shift button #6-width .65" x height 3.40"
Sweethearts
Couple with layer-2.75"

How about a GIVEAWAY?

 Gypsy Gold & Black Silicone Sleeve
Leave a comment saying what your favorite feature about the Gypsy is. If you don't own a Gypsy yet then tell me one reason you would want one. I would also love if you would follow my blog so I can share many more Simple Creations with you.

Now it's your turn! 
Let's see your Share the Love projects!  Make sure to include a Cricut cut somewhere on your project and the word Love!

Next stop... 
Angji's blog, http://sweetpineapplescrapping.blogspot.com.
Go see what she has in store for you today... And when you're done, make sure to link up your project to FCCB's Fantabulous Cricut Crawl post to be entered into the contest!

Happy Crawling!