Showing posts with label Paper Trey Ink Stamps. Show all posts

Tuesday, March 25, 2014

PaperTrey Ink March Blog Hop Challenge


Challenge: High Gloss
I created this card for the PaperTrey Ink March Blog Hop Challenge
If you enjoy this project see how to follow my blog, on the right side, to see more Simple Creations. On this card I did alot of Stamping & Heat Embossing with Clear Embossing Powder to create a High Gloss shine.


Supplies:

Stamps: PaperTrey Ink Background Basics: Postmarks
Paper: PaperTrey Ink White, Hawaiian Shores, Harvest Gold
Ink: PaperTrey Ink Pure Poppy & Versa Mark
Other: Twine, Clear Embossing Powder, & Rhinestones

To create the base layer I stamped with Versa Mark ink and then heat embossed with clear embossing powder. But on the light Harvest Gold paper it didn't show up like I was hoping. So I rubbed a Pure Poppy ink pad over it. Then I wiped off the ink on the embossing with a baby wipe. I love the result. Now it really pops off the page. 

Thursday, May 26, 2011

Sympathy Card - Make It Monday #16 - PaperTrey Ink

With Sympathy


This card is for PaperTrey Ink's Make It Monday #16 Challenge
The project must use at least one Papertrey product and have a "with sympathy" type sentiment.
If you would like to join this challenge click HERE.

Paper Trey Ink Supplies
With Sympathy - Daily Designs Sentiments Stamp
Buttons
Twine

Other Supplies
Hero Arts - Canvas Stripes - Cling Stamp
Leaves
Sakura White Gelly Roll Pen

Wednesday, May 18, 2011

Hello There - PaperTrey Ink Card

 Hello There


I made this small card using PaperTrey Ink Stamps from Tag-Its #1. It was a simple small card. I also used a cuttlebug embossing folder, ribbon, Martha Stewart ink pads, and my Copic Markers.

Tuesday, April 5, 2011

Notebook with Pen

I love making Post-It note holders with pens and I never thought to make notebook covers until I saw a post that by blogging friend, Marianne from, Paper or Frabric Crafter. These notebooks are the magnetic one's you can find in the dollar sections. I decorated the outsides to go with the theme of the paper. The notebooks can be different sizes but these are the cover instructions for these. I usually make the cover with a heavy card stock, like Papertrey Ink, so that it is durable.
Notebook size: 3 1/2" x 7 1/2"
Cover size: 7 5/8" x 8 3/8"
Score cover at: 3 5/8",  4",  4 3/8",  4 3/4"
Cut middle section about 1" apart to hold pen.
When using mini pens like these the score marks are 3/8" apart. Knowing that helps alter  the measurements for other size notebooks.

 Simply Charmed Cricut Cartridge
Notes: 1"
Paper: 3.25"
Pencil: 3"


Live Simply Cricut Lite Cartridge
Flower: 2"
Stamp: Papertrey Ink - Daily Designs Sentiments


 Doodlecharms Cricut Cartridge
Apple: 2.5"
Cuttlebug Embossing Folder

COMING SOON...
I filmed a video today of a Notebook with a normal size pen and a 4x6" Sketch Pad. It also has a Lori Boyd digi stamp that I colored with Copic Markers. So check back soon to see that.

Friday night at 8pm is the Pinkalicious Blog Hop. It will start at mypinkstamper.com then hop through all the the My Pink Stamper's design team. I have an fun project to share with you then. So keep checking back for more Simple Creations.

Friday, March 4, 2011

Copic Creations Challenge #45 - Complementary Colors

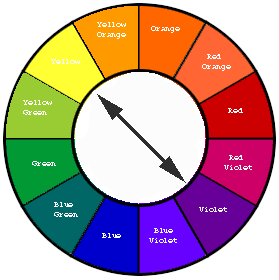
Complementary colors are found on the opposite sides of the color wheel.  So I created my card using Purple & Orange.  I am new at coloring with Copic Markers but they are so much fun & I am learning as I go.


Supplies Used
Copic Markers
YR04
YR68
Y38
V15
V91
Giraffe Stamp - Baby Animals - Inkadinkado
Sweet Baby Stamp - Daily Designs Sentiments - Paper Trey Ink 
Purple Paper - Core'dinations
Orange Paper - Lion Sleeps - K&Company
Ink - Memento - Tuxedo Black
CuttleBug - Embossing Folder

Saturday, January 22, 2011

Crafting with Cristina Challenge #15- Color Challenge


Crafting with Cristina Challenge #15 
Create a Project using the colors Black White and Grey ONLY.


 Supplies
Making Memories- Wedding Designer paper pad
PaperTrey Ink- Fillable Frames #4 Stamp Set
PaperTrey Ink- Die
Martha Stewart Glitter- Crystal Fine
Pop Dots
Buttons
Embroidery Floss

I have a funny story about the card. My daughter wanted to make cookies so she could put sprinkles on top. So I told her, lets make a card & put glitter on top. So I had to glitter around the frame for my daughter. She is 3 1/2 and has already taken over my crafting table. Yesterday I had to move to a different table to work on my projects.

I am so excited....I will be a guest designer for Crafting with Cristina in February. 
So look for more projects to come.

Monday, January 10, 2011

Winter Warmies FCCB Challenge #42

Winter Warmies FCCB Challenge #42
Use some type of winter clothing/accessory on the project. At first I wasn't sure what I wanted to make & then I thought of this cute little beaver with the scarf. Then I wanted to make a card using the Smiley Cards. So this is what I designed.


The card base is from Smiley Cards. The outside layer is cut at 3.5" & the inside layer is cut at 3.25". Then I cut the tab off the inside layer. The patterned background was cut with Plantin SchoolBook at 4". I am not sure what size the blue layer to write on was. The beaver was cut from Winter Frolic at 2". Then I inked it & made details with a glitter gel pen. The Sentiment is from PaperTrey Ink -Daily Designs Sentiments. I hope you enjoyed this unique card design.
Join us at the Fantabulous Cricut Challenge Blog (FCCB) and post your own Winter Warmie. Just include at least one Cricut cut & use some type of winter clothing or accessory on your project.

Wednesday, January 5, 2011

Fresh Brewed Challenge #29


 Fresh Brewed Challenge #29
This is my first card I have made with Copic Markers. I just got them for Christmas & have played around with them a little. I purchased a few Digi Stamps from Fresh Brewed Designs & wanted to give this challenge a shot.


This is the sketch for this challenge.
I used Fresh Brewed Designs-Christmas Angel Cake, Copic Ciao Markers, Star Dust Stickles (on the wings and hair), Glossy Accents (on the shoes), PaperTrey Ink - Signature Christmas Stamp, Swiss Dots Embossing Folder by Provo Craft.

These are the following markers I used.
Skin- E51, YR00
Blush- RV42
Dress- RV21, RV 34
Hair- E51, E33
Wings- RV42, Colorless Blender
Leaves- G94
Berries- R46

Since I am just staring to use Copic Markers I quickly realized how important the paper is. What paper do you use? I bought a special marker sketch pad at Hobby Lobby but even that bleeds bad. I just ordered Neenah paper but haven't tried it yet. What paper do you prefer?

Monday, January 3, 2011

Snowy Delights -FCCB Challenge #41

Snowy Delights
Make a project with snow or snowflakes. Needs to have at least one Cricut Cut on it.
Join this challenge by clicking HERE.

I made this Snow Globe card using the Doodlecharms Cricut Cartridge.

The globe is cut at 4.25"
Snowflakes are cut at 2"
Blackout feature of snowman cut at1.68"

Other supplies:
Peachy Keen "Snow Cutie Face" Stamp
Paper Trey Ink "Daily Designs Sentiments" Stamp
Pebbles Chalk
Star Dust Stickles
Embossing Powder
DCWV-the Winter matstack
Coredinations Paper
The Snow Globe is popped up and the snowman is popped up with foam dots.

Don't forget to click the link above to join us for the Fantabulous Cricut Challenge Blog 
to enter your Snowy Delight project.

Wednesday, October 13, 2010

Frame Stamp and Cricut Cut

Frame Stamp and Cricut Cut


I want to share something special with you that I figured out. I have the PaperTreyInk Fillable Frames #4 stamp set. I wanted the frame cut out & I didn't want to do it by hand and I don't have a punch. I found this cut on Accent Essential Cricut Cartridge. I tried cutting it a few times and finally decided this was the best cut: W-3.44, H-2.04" in the shadow feature. I changed this image on my gypsy by unlocking the width and height button and adjusted the size to what I wanted. If you have any questions please email me. As always I love comments.