Showing posts with label Wild Card Cartridge. Show all posts

Tuesday, July 26, 2011

The Lord is my Strength...

I purchased my first set of "Unity Stamp Co."  stamps at CHA. I love how well they stamp. They are the red rubber with just the black foam backing. Then I put it to my acrylic blocks and it stamps beautifully. This is a different style of card for me but I love how it turned out.


Supplies & Instructions
Stamps: Unity Stamp Co - Devoted
Cricut Cartridge: Wild Card - button #45 - 4.5"
Chalk: Pebbles
Ink: Martha Stewart
       Color Box - White
Embossing Powder & Ink: Versa Mark Watermark Ink & Clear Embossing Powder
Glossy Accents
Pen - Sakura Gelly Roll - White Pen

I used several techniques for this card. The base of the card I stamped the butterflies with a Versa Mark watermark ink and then embossed it with clear embossing powder. Then I colored the butterflies with Chalk. The sentiment I stamped with a Color Box white ink. But since White ink has a hard time drying I embossed it with clear embossing powder. Then I stamped the trees, accented with chalk, cut out the tree on the front and accented the leaves with Glossy Accents.


Saturday, June 18, 2011

Graduation Card

The hardest cards for me to make are Graduation and Mono Chromatic, meaning a card primarily with one color. The reason Graduation cards are difficult for me is because I don't have very many Cricut Cuts or Stamps to choose from. The cap on this card was cut from Wild Card Cricut Cartridge. It is actually a card and there are no layers for it. So the way I cut it is on my Gyspy, and I move it to the edge so only the front of the cap is on the mat. Then I cut it out and trim off the extra paper. So finally I figured out how to make a Graduation Cap with the Cricut Cuts I have.


Inside

Supplies & Instructions
Wild Card Cricut Cartridge
Cap - Button #42 - 5.15" (only use 1 side of the cap card)
Scroll - Button #42 icon - 5.15"
Tassel - Button #42 liner - 5.15"
Plain Paper - Core'dination
Pattern Paper - DCWV The Grade School Stack
Color Scroll with Slate color Copic Marker
Brad

A bit about me....
I have been working on alot of projects. I sell my cards, notebooks, and paper crafts that I make. Tomorrow is our Church's Father's Day Fest. Its a hug outdoor event with a service, car show, monster trucks, cook-off, live bands, and I am running a craft fair at it. I am so excited to sell projects and cards I have made. What I sell will pay for my day at CHA Chicago in July. So I am praying for a profitable day. I am looking forward to tomorrow so much! Well enough about me, I need to go make some more stuff :)

Thursday, May 26, 2011

Graduation Cards

Congratulations
I had an order for graduation cards and I didn't have a good Cricut Cartridge or stamp for graduations. I also didn't know what their school colors were, just their gender, so this is what I came up with.


Supplies
Wild Card Cricut Cartridge
Button #28
Card - blackout - 5"
Envelope - 5"
Congratulations - 5"
Sakura White Gelly Roll Pen
Graduation Cap - Dimensions Clear on Clear - Special Occasions Stamps
Colored the cap with Copic Markers
Blue Paper from DCWV Winter Matstack


Wednesday, May 18, 2011

Graduation Card - MPS Fancy Phrases

Congratulations
One of my favorite new stamps sets that My Pink Stamper just released is Fancy Phrases. You can use it for so many different cards. To see all of My Pink Stamper's Stamp Sets, click HERE.


Recipe:
Wild Card Cricut Cartridge
Button #35
Card, Envelope, Fish, Frame - cut at 4.5"

This is such a versatile guy card. I also use it for Father's Day by just changing the stamps.


Monday, February 7, 2011

Fantabulous Cricut Crawl- Share The Love!

Sweetheart Card - Love Is Life
 
Welcome to Simple Creations and the fourth Fantabulous Cricut Crawl...Fantabulous Cricut's version of a blog hop! 

Valentine's Day is in a week and everyone at Fantabulous Cricut has decided to Share the Love!   Each Design Team member will be featuring an original Valentine-themed project that includes the word LOVE somewhere on it.

If you've come from visiting  Andrea at http://divinedomestic.blogspot.com, you're in the right place! If you've just happened across my blog and would like to play along with our Fantabulous Cricut Crawl, start HERE.

Make sure to check out each DT member's blog for some awesome inspiration! There will be PRIZES along the way at some of our DT members' blogs, AND there will be a Grand Prize up for grabs at FCCB for one participant that submits a "Share the Love" project at FCCB!
How fun is that?

For my project...


 I curved this stamp on my block to stamp it around the circle.

 I copied this cut 4 times on my gypsy. In each cut I hid some of the cuts using this button under the advanced tab on my gypsy. I cut the hair and shoes in brown, their shirts in white, the silhouette in a pale cream color, then his pants in brown and her skirt with a patterned pink paper. This is how I was able to cut out so many colors with out repeating the same cuts over and over. I LOVE MY GYPSY! I waited 2 months to get it replaced and I didn't know how to function and create without my GYPSY. Sometime I will do a post all about why it is a Must Have.

 I shaded the cuts with my Copic Markers. I have only ever used them on white paper. I love how it made the card come to life and added detail by shading a bit. Then I gave her a stickle earing & ring.

Stamps
Love & Love is Life are both from My Pink Stamper's Love-alicious Stamp Set. These stamps are made from an amazing quality & stamp so clearly. She just released 10 new stamps sets. Check them out HERE.

 Cricut Cuts
Wild Card
Card base-blackout-4.75"
Just Because Cards
Circle-real dial size-3.91"
Frame-shift button #6-width .65" x height 3.40"
Sweethearts
Couple with layer-2.75"

How about a GIVEAWAY?

 Gypsy Gold & Black Silicone Sleeve
Leave a comment saying what your favorite feature about the Gypsy is. If you don't own a Gypsy yet then tell me one reason you would want one. I would also love if you would follow my blog so I can share many more Simple Creations with you.

Now it's your turn! 
Let's see your Share the Love projects!  Make sure to include a Cricut cut somewhere on your project and the word Love!

Next stop... 
Angji's blog, http://sweetpineapplescrapping.blogspot.com.
Go see what she has in store for you today... And when you're done, make sure to link up your project to FCCB's Fantabulous Cricut Crawl post to be entered into the contest!

Happy Crawling!

Monday, November 15, 2010

FCCB Challenge #36 - Achoo!

FCCB Challenge #36 - Achoo!

Get Better


This weeks Fantabulous Cricut Challenge was to Create a project
having something to do with being sick (i.e. get well card, band-aid, "flu-bug", etc.)
Join us this week and create something for this challenge that could cheer up someone who is feeling sick.

Instructions:
Wild Card Cartridge pg 65 button 34
Bandaid card blackout - 5.75"
Top of bandaid - Liner -5.75"
Inside of card- bandaid card blackout - cut in half - 5.25"
Envelope - 5.75"
Envelope liner - 5.75"
Since I used pattern paper for the liner I cut another piece of brown to cover the holes on the envelope flap. Dr. Bag - Frame - 5.71"
I drew Rx on it because my husband thought it looked like a purse instead of a Dr. Bag.

 
                                 Inside of card & envelope.

Detail on Card.   

                                                                 Detail on the Envelope.
                                   
I hope you enjoyed my card & head on over to the Fantabulous Cricut Challenge Blog.
Create a card for this challenge and post it at FCCB.

Thursday, August 12, 2010

Cow's It Going?

My Pink Stamper just introduced her design time for the 2nd term with projects they made.
My Pink Stamper Challenge: Make something with a Critter or Animal Theme.
Since I don't own the Create A Critter Cartridge yet....I made my card using Paper Doll Dress Up. The Cow & Fence are Accessories to the Cowboy Doll.
Recipe:
Cricut Cartridges-
Paper Doll Dress Up:
fence- 2.3"
cow- 2.5"
Wild Card:
sun-3"
Supplies: Martha Stewart Opaque Markers- pink & white
Martha Stewart-ink melon (around the sun)
Pop up dots- cut in half for sun
My Pink Stamper Stamps- More Punny-licious
Peachy Keen Stamps- Basic Paper Doll Faces (eyes)
Glitter Glue-crystal (eyes & lips)
Distress Ink-tea dye (sponged on tan paper)

This cow is just one cut & doesn't have any layers so I cut it out in pink, white, and brown & made my own layers. Then I dressed it up with pink toes, ears, and lips. Accented with glitter glue & opaque markers. I didn't put the cow completely in the fence so all the details would show. The cow is poking it's head out of the fence.

Check out her lipgloss!

I asked my 1 1/2 yr old if she liked my cow & she said, "Moooooooooooooooo." I took that as a yes. This was a fun card to make & I hope to get the Create A Critter Cartridge to make more critter cards & layouts.
I also enjoyed using MPS stamps. This is the first time I got to use them.


Sunday, June 13, 2010

Wedding Money Holder & Card


This is a Money Holder & Wedding Card from Wild Card Cartridge.

Money Holder (pg.46-shift)  6"
Bride & Groom (pg.63) 7" cut it twice,
in 2 different colors, then cut the bride & groom apart on one of them & layer.
Car (pg.63) 8"
For the Happy Couple (pg.63) 11.5"

Cake Card & Flowers (pg.63) 5"

Here is what the Cake Card & money look like inside the Money Holder.
The goal was to have a money holder but also include a card so there is a
place to write a note For the Happy Couple.

Saturday, June 12, 2010

Father's Day Fish Card

Father's Day Fish Card

Wild Card Cricut Cartridge
Everything was cut at 4.5"
I found some great coordinating cardstock
I used some scrap cording (I probably got off a pair of new shoes)
I've started saving packaging and stuff I think I might be able to use in projects.
I also raised up the frame with foam dots to give it some dimension.
I distressed it by sanding the edges & inking the edges with the
Color Box Fluid Chalk Inkpad-Chestnut Roan Cats Eye

Wednesday, May 5, 2010

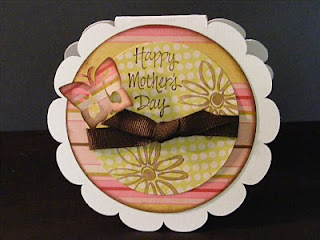
Doily Card- Happy Mother's Day

This Card has a long Reciepe but it was alot of fun to make. I designed it on my gyspy but it could be made with only a Cricut with a couple adjustments. Other Cartridges can be used for a basic circle & butterfly. Scraplift this & make it your own.
Cricut Cartridges:
Wild Card- Doily Blackout Card- Cut 4 1/4"
Mini Monograms- Circles- Cut 5 1/4" & 4 1/4" 
Gypsy Wanderings- Butterfly- Cut 1"
Paper:
White Cardstock 8 1/2"x11"
K&Company Lovely 12x12 Paper Pad - double sided
Ribbon:
Celebrate It Basic Narrows from Michaels
Stamps:
Stampin Up- Happy Mother's Day
Autum Leaves- Flower
Ink:
Color Box Fluid Chalk- Dark Brown
Tips:
The flowers were first stamped on scrap paper & then on the circle, so they would be lighter. Stamp the flowers before putting the ribbon on. The butterfly is raised up with foam squares and I bent the wings up slightly to apear flying. This could be a basic layout for many cards. Try making it & have fun!

Sunday, May 2, 2010

Wedding Card & Envelope - Wild Card Cartridge

This was cut with the Wild Card Cricut Cartridge at 4 1/2". Next time I would make it larger. It was more like a gift tag size then a wedding card that you want to share lots of advice in. The Bride & Groom I cut twice then cut them in half. I tried it two different ways I like cutting the groom & adhering it to the bride. It layered better that way. This was a very easy, fun, & cute project.

Saturday, May 1, 2010

You Made My Day- Wild Card Cartridge

You Made My Day

National Scrapbooking Day
Appreciation Challenge from

Used Wild Card Cricut Cartridge
Cut everything at 5 inches
Used brown ink pad to make branch brown
Used stickles on the bird's eyes to enhance